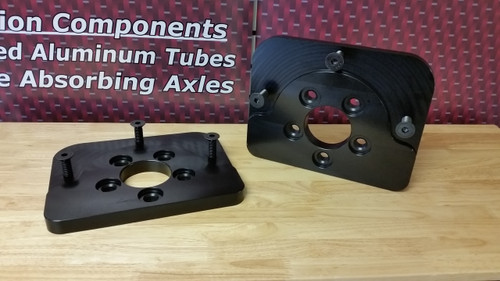
Precision Rear End Housing Fixture; 9" Ford; Measure/Straighten/Jig 9" Ford Housings Includes: Fixture, (2) Hub Measurement Plates (Wide Five Pattern), Digital Toe Gauge, Tools, & Instructions
ADVANTAGES:
Checks Axle Tubes and Side Bell for Straightness
Straightens Bent Axle Tubes
Sets Toe and Camber in Axle Tubes
Must ship truck freight. Shipping weight approximately 175 lbs.
 |
WARNING: Cancer and Reproductive Harm www.P65Warnings.ca.gov |
***Add 5x5 Adapter Plates for 5x5 hub pattern.***
DRP Precision Rear End Fixture Instructions
Measuring Toe
- 1. Place rear end on fixture, install caps, set pinion angle and tighten cap locking bolts. (Tighten bolts only enough to keep the rear end housing from spinning.)
- 2. With hub plates installed, place digital caliper on studs behind rear end (Cover Side), left tube or right tube. Press Zero.
- 3. Move digital caliper to front studs and read toe. A positive number indicates Toe In. A negative number indicates toe out.
- 4. Repeat procedure on opposite side.
Measuring Camber
- 1. Rotate rear end housing 90 degrees down. (If your pinion angle is 3 degrees, the cover should be reading 3 degrees down.)
- 2. Place digital caliper on studs behind rear end, left tube or right tube. Press Zero.
- 3. Move digital caliper to front studs and read camber. A positive number indicates negative camber. A negative number indicates positive camber.
- 4. Repeat procedure on opposite side.
**Approximately .500” = 1 Degree; Approximately .250” = ½ Degree**
Straightening Axle Tubes (Toe In)
- 1. Attach one end of the straightening strut to the hub plate, leave the other end disconnected.
- 2. With the digital caliper on the front studs, reading current toe, heat the front side of the axle tube (3 o’clock when looking at the hub) in a small circular motion (3/8” – 1/2” circle) until the axle tube expands by .100” on the caliper.
- 3. Attach the straightening strut on both ends and adjust strut until the desired ending toe is obtained.
- 4. Quench tube with wet towel or running water until cool.
- 5. Bring straightening strut to neutral and measure tube, zeroing caliper on back and measuring on front.
- 6. Repeat process as necessary to reach desired measurement.
Straightening Axle Tubes (Toe Out)
Use same procedure as above, heating tube on the back side (9 o’clock when looking at the hub). Heat until the digital caliper shortens .100”, attach strut and tension until desired measurement. Cool and re-measure.
Straightening Axle Tubes (Camber)
- 1. With the housing rotated 90 degrees as stated above in the camber measurement procedure and the digital caliper in the front reading the current camber, heat the “front” of the tube (3 o’clock when facing the hub) for negative camber and the back (9 o’clock when facing the hub) for positive camber. Use the straightening struts the same way as toe.
Notes:
- Always have all through bolts installed and properly torqued before measuring rear.
- Always leave straightening struts disconnected when measuring tubes.
- Tubes will typically only straighten approximately .030” each time.
- Once a tube has been heated in one spot, move to another spot to straighten further.
- Heating closer to the snout will give you a more fine adjustment.
- Heating closer to the bell will give you a coarser adjustment.
- If you heat the tube and it expands slowly or stops expanding before reaching .100”, stop heating and move to another spot.
- When you heat the tube, it expands in the opposite direction you want to go. When it cools, it contracts further than it expands. The straightening struts aid the cooling process.
- With the digital caliper reading current toe, you can loosen the cap bolt and rotate the housing through its pinion angle range to see your dynamic toe change.
- You can use a digital angle finder on the hub plates to measure camber without rotating the housing 90 degrees. Measure the fixture angle first. If it is not level, account for that in your camber reading at the plates.
- On quick change rears, the side bells can often bend. To measure this, take a 12” digital caliper and measure from the “ears” on the axle tube caps to the side bell on each side. You can do this in the toe and camber planes.


